Adding individual users
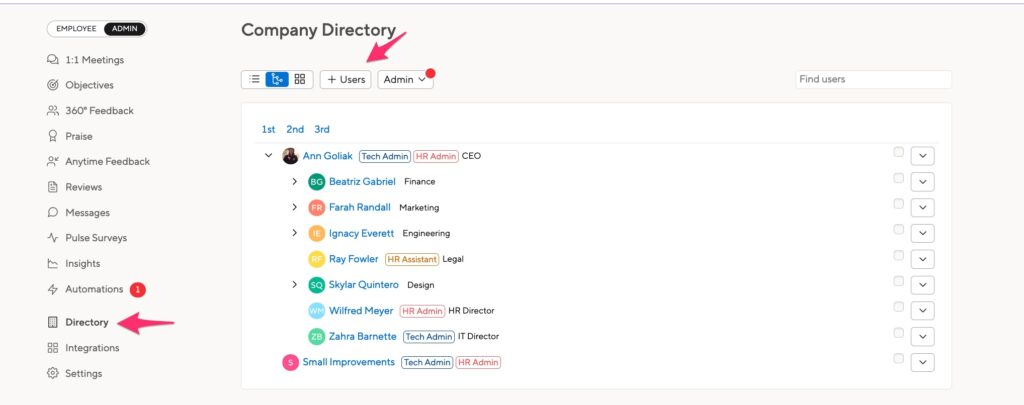
To add a single user, go to your company directory page, and click the “+Users” button.
You can then enter employee information in the pop up:
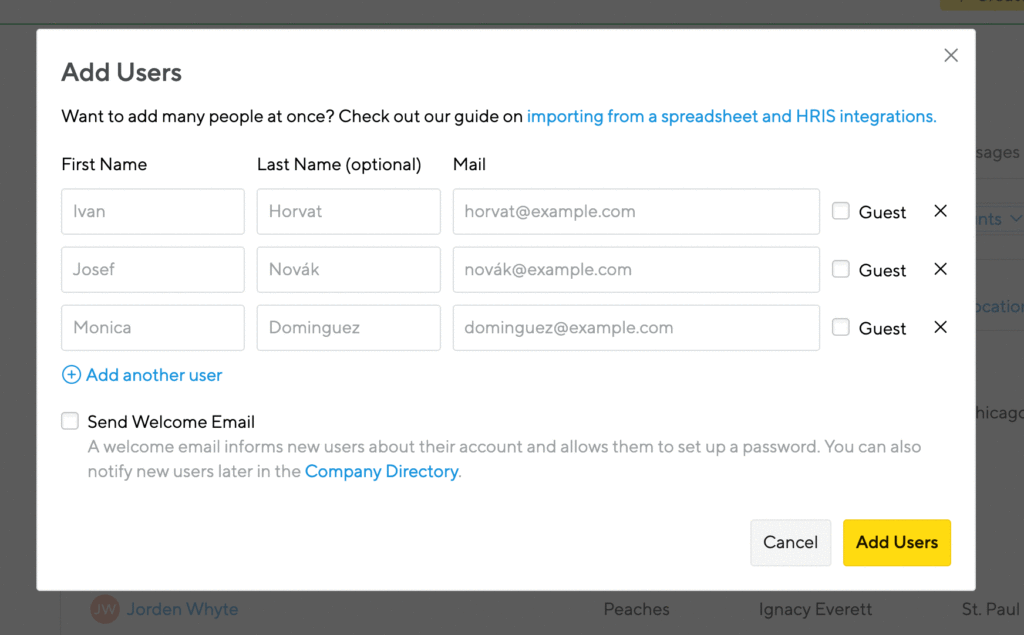
If you want to send a welcome email right away, check that box. But don’t worry – you can always send that email later on.
Learn more about Guests in your account.
Importing users with Excel or CSV
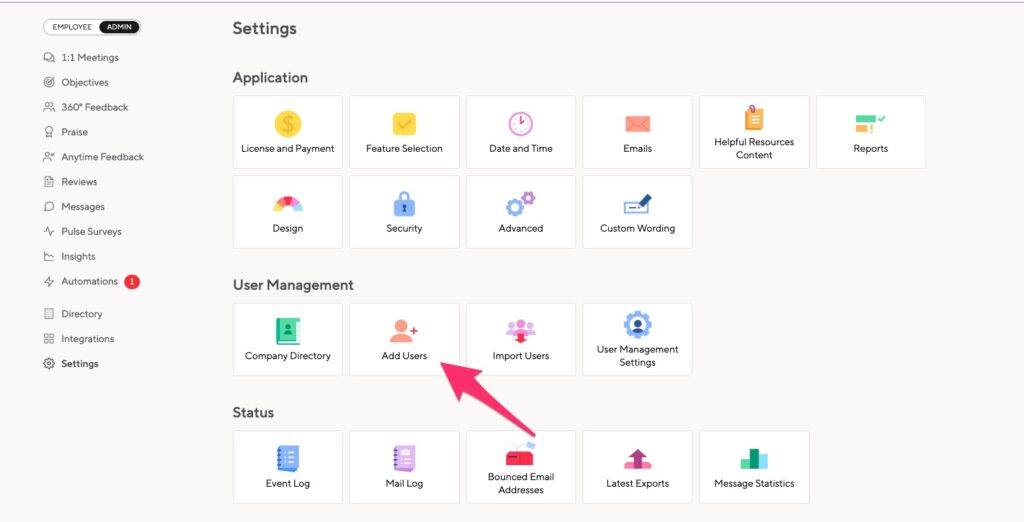
Click Settings > Import Users to upload a file.
File Structure
First, you need to create the file, following our guidelines below. Then, you will drag & drop it onto our special user-import admin screen. But first, learn about the format of the file you need to create.
Download our template user import file to get you started:
When you download this file, right-click on it to open in Excel or your preferred spreadsheet program. Our Import Users tool works perfectly well with any comma, semicolon, or tab-delimited spreadsheet (CSV).
Leave the sample import file as-is. We map the field based on the column order, not the column heading. Don’t remove any columns, even if they are empty.
Import fields
Your import file needs to contain a handful of “must-have” fields so we can set up users properly. You can also include optional information in some fields. Including this information will allow you to better sort your directory and filter cycle exports.
You can set up your own file using the list below as column headers. The columns must all be included, in this order. Required fields*
| Column | Field Name | Description |
| A | First Name* | For example, “Joe” |
| B | Last Name* | For example, “Smith” |
| C | Gender | This may be M, F, or N. We use the gender information to fill in preferred pronouns in notification emails: he/him, she/her, they/them |
| D | Title | For instance, “Senior Manager” or “Intern” or “CEO” or “Nerf herder” or whatever makes sense for your company. This is a free-text field. |
| E | Login Email* | For example, “joe.smith@company.com” The user’s email address. People will use this to log in to the system and receive mail from Small Improvements. Note that this email address must be unique for each user, as Small Improvements uses the email address to identify specific users unambiguously. |
| F | Manager Email | You can leave this field blank if the employee does not have a manager. Note: Do not use the manager’s name in this field. We also support the use of employee IDs to reference managers. For example, if you have a user John with employee ID 1000, you can set this field to 1000 to set John as the manager of this user. |
| G | Department | Department is the larger organizational unit (“Marketing,” “Sales,” or “Engineering”). This is a free-text field. |
| H | Team | Team is the more fine-grained unit: “Outbound Sales” vs “Key Accounts” vs “Social Media Marketing,” which could all exist within a single department. This is a free-text field. |
| I | Location | Could, for instance, be the city: “Berlin” or “San Francisco”, or a more fine-grained office location (“Building 3”, or “Floor 15”) if your offices are scattered throughout a single city. This is a free-text field. |
| J | Employee ID | A unique identifying number for each employee. |
| K | Hiring Date | Provide it in the format MM/DD/YY or YYYY-MM-DD. |
| L | Alternative Email | If this field is filled in, we’ll send notification emails to this address instead of the login address. |
| M | Secondary Manager | A dotted line manager or coach; someone who can contribute to the employee’s performance review. |
| N | Preferred Name | If this field is filled in, we’ll display this name instead of the First Name that is entered. |
| O | Leaving Date | Provide it in the format MM/DD/YY or YYYY-MM-DD. |
| P | Termination Type | Can be “Voluntary” or “Involuntary” |
| Q | Employment Type | “Furloughed,” “Casual,” “Seasonal,” or “Temporary.” If you leave this blank, we’ll default to Full-time. |
| R | Active / Account Status | Use “Active” or “True” for active accounts. Use “Inactive” or “False” for inactive accounts. If this field is blank, the importer will assume Active and reactivate inactive employees. |
Configuration Options
There are some configuration options to be aware of when importing from the configuration tab within the import users screen.
Overview of these options:
- Update existing user core fields (except manager relationship).
This setting indicates whether existing users in Small Improvements should be updated with information from the import data. The data is matched based on email address. Enabling this does not affect manager relationships of existing users. Note: by default, you cannot update employee IDs through import. Please contact the support team to enable. - Update managers of existing users.
This setting indicates whether existing users in Small Improvements should have their managers updated based on the given managers from the import data. - Set managers of newly imported users.
This setting indicates whether new users imported to Small Improvements should have their managers imported. - Send password emails for new users imported.
Password emails can be sent automatically for any new users that you import. (You can also decide to send emails manually after the import. More info: How to inform staff about their accounts) - Deactivate all Small Improvement accounts not imported.
This setting controls whether user accounts will be deactivated if they do not appear in the imported accounts. This allows you to deactivate users in bulk. Warning: if you enable this option, it could cause your administration account to become inaccessible! - Reactivate accounts in Small Improvements
This setting controls whether deactivated user accounts will be reactivated if the corresponding account is imported. If a user account has been deleted, it will automatically be recreated through an import file. - CSV Delimiter
Allows you to set a field delimiter other than comma. You can use this if your import file is delimited by a semi-colon (European Excel) or Tab.
File Upload
If you made it this far – congratulations! You can now upload your file into Small Improvements on the User Import screen. Just drag and drop the file to preview the import.
Updating Users through Import
If you rename a department or move office locations, it can be a pain to update every user profile one by one. Instead, you can import a file to update many employee accounts at once.
Export your Directory
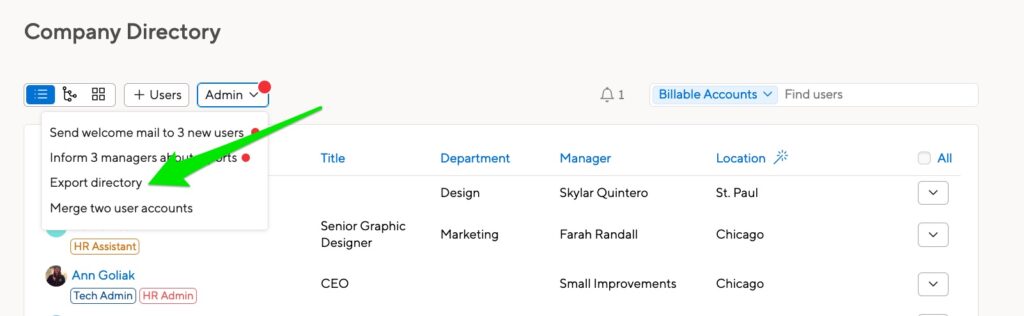
You can export a CSV file with your current employee directory and use that to make updates.
Click the Admin menu on the Directory page, then select Export Directory.
Then select Import File.
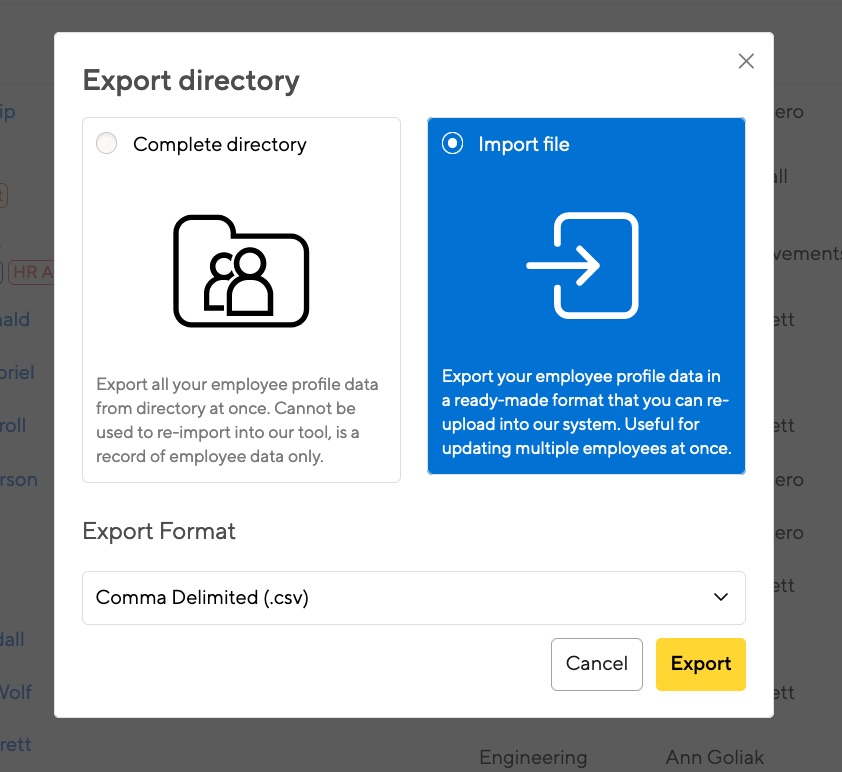
This will create a spreadsheet of your employees, containing just the fields on the profile page.
Update your employees’ information.
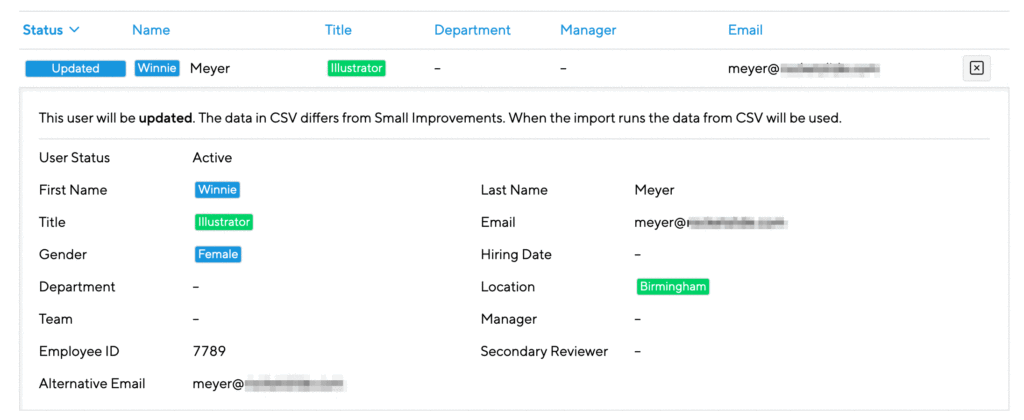
The file is already formatted for import, so all you’ll need to do is make your updates. If the data in the import file matches the data in Small Improvements, we will ignore that field.
Large spreadsheets can be overwhelming to work with, so it might be easier for you to delete the extra data. If a field is empty in the import file, we will not delete the data in Small Improvements.
The user’s email address is required, and you’ll need to have information in the First Name field (though it can be an updated first name). Enter any updated information, and leave the unchanged fields blank.
Note: By default, you cannot update employee emails through import. Please contact the support team for assistance.
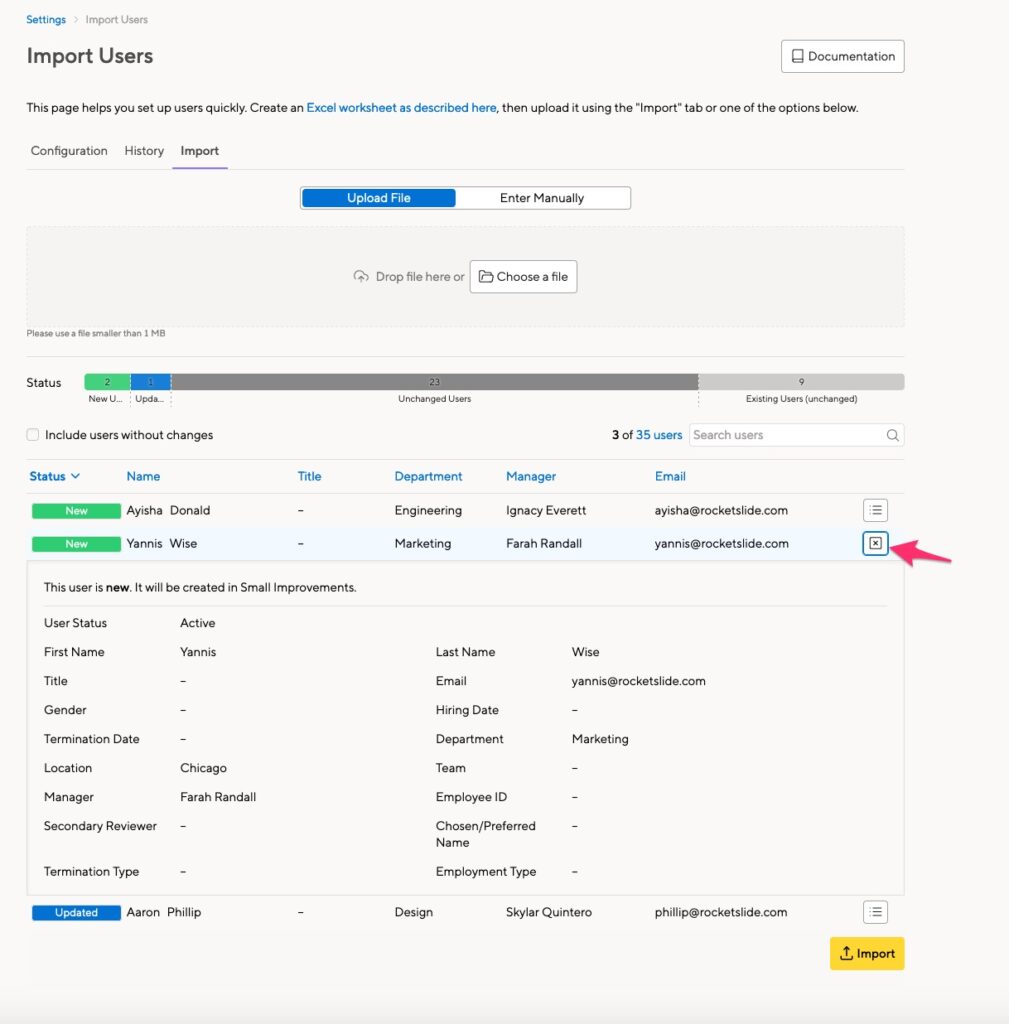
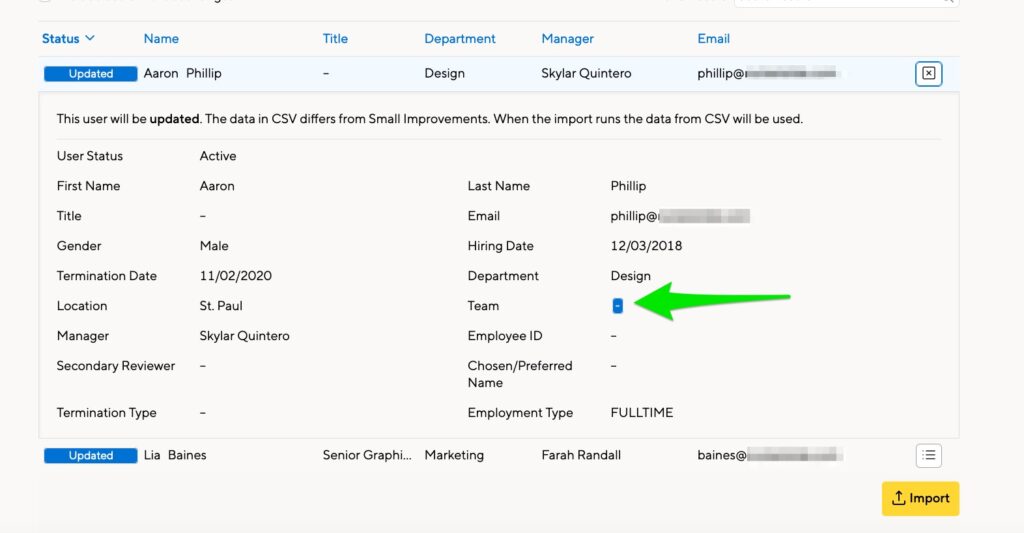
When your import file is ready, upload it, ensuring “Update existing user core fields (except manager relationship)” is enabled in the Configuration tab. Take a look at the preview to make sure everything is correct. New information is highlighted in green, and updated information is highlighted in blue.
Using import to clear data
Leaving a field blank will not delete data in your import. Instead, add a dash ( – ) to the field you want to clear.

When we check the preview, we’ll see the data is cleared.
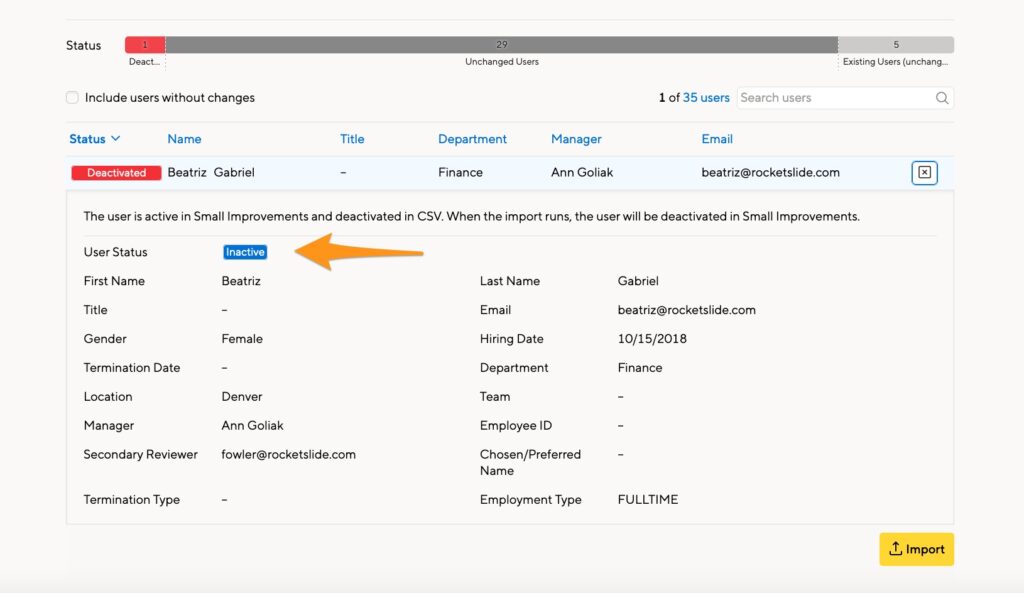
Using import to activate or deactivate employees
You can change an employee’s account status to Active or Inactive using an import file. You’ll enter that information in Column R, Account Status.
- To deactivate an employee, use “Inactive”
- To activate an employee, use “Active”

If you leave the field empty, the importer will assume ‘Active’. This means any deactivated employees will be re-activated.
Typical Problems and Error Cases
There are some common problems to watch out for:
- Excel “noise”: Occasionally Excel files can have bits of data that you can see with a quick scan of the eyes, especially if you are copying and pasting from another source. If you run into an error where the system is telling you there are “too many columns”, yet you don’t see any additional column then the ones we use on the template, you probably have a noise problem.
- Try: Tabbing over to the last column that you see data in, then the next column over (which looks blank), highlight the whole thing plus roughly 10-20 more blank columns to the right, then delete, save the file, try re-uploading.
- Manager’s name instead of email: This is the classic mistake. For each employee we need their manager’s email address or employee ID, not the manager’s name.
- Using inconsistent email addresses: A typical problem is that a Joe Smith has an email address of “Joe@company.com”, but his 5 reports are listed as reporting to “joe.smith@company.com”. Our system cannot know it’s the same person, and thus these 5 people end up with no manager. Please ensure that matching email addresses are used consistently. Double check people who joined the company early on, and who might have more than one email address.
- Using a less common domain: Some of our customers have more than one email domain, so staff can be reached at maria@company.com and at maria@company.co.uk, for instance. Now if you import the less common form, you’ll likely have more people trying the other one, not being able to log in, and thus reporting back that the system doesn’t let them in.
Importing users from HRIS integrations
If your company uses one of the following HRIS, you can set up an integration to import HRIS employee data to Small Improvements:
Automatic import from another server
Small Improvements can also pull your user data from a remote server.
Before you start, please ensure that the file generated by the remote server can be downloaded and manually imported into Small Improvements. If that works, then enabling the automatic import will be easy.
Click Integrations > Custom CSV Import. The config screen will contain a section looking like this:

Just enter your credentials and the server’s URL, using https, and save the screen.
But don’t set an automatic import cadence just yet! Move to the preview tab, you’ll see a new “Fetch” button that will help you preview the server’s dataset.
Once you’re happy with the Preview, you can enable the automatic sync on the Configuration page. We’ll fetch the file every 2 hours and make any updates we find.
Next Steps
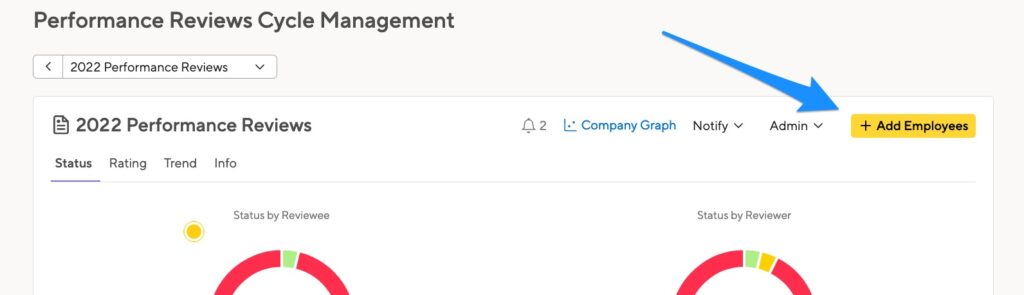
When you add new employees, they are not automatically added to open Performance Review or Feedback cycles. You can add them manually using the Add Employees button in each cycle.
If you have an ongoing Objective cycle that is open to everyone in your company, the new employee will be added to that cycle automatically. New employees are not automatically added to limited objective cycles.